Strong organizational skills are essential to success in this game we play, and while useful apps like AwardWallet exist to help us log our points balances in various programs, there’s really no better way to track your credit card portfolio than a good old-fashioned Excel spreadsheet.
Over the years, many readers have emailed me to ask how I keep track of all the credit cards that I have open (especially when they’re first starting out along the process), and I received another flood of such questions after publishing last week’s post on my credit card application strategies.
I therefore thought I’d share the spreadsheet I use to track my credit cards as a follow-up to that post, in order to help you stay organized as you conquer the many sweet signup bonuses out there.
By no means is this the most advanced spreadsheet out there, but I think it does a fine job of keeping track of my credit card accounts, how many bonuses I’ve received, how much I’ve paid in annual fees, and which cards I have open and closed at a given moment in time.
Click here to download the spreadsheet (desktop only), and read on below to find out exactly how it works. (I’ve modified some of the information in the spreadsheet for privacy reasons, of course.)
Credit Card Tracking Spreadsheet: Columns
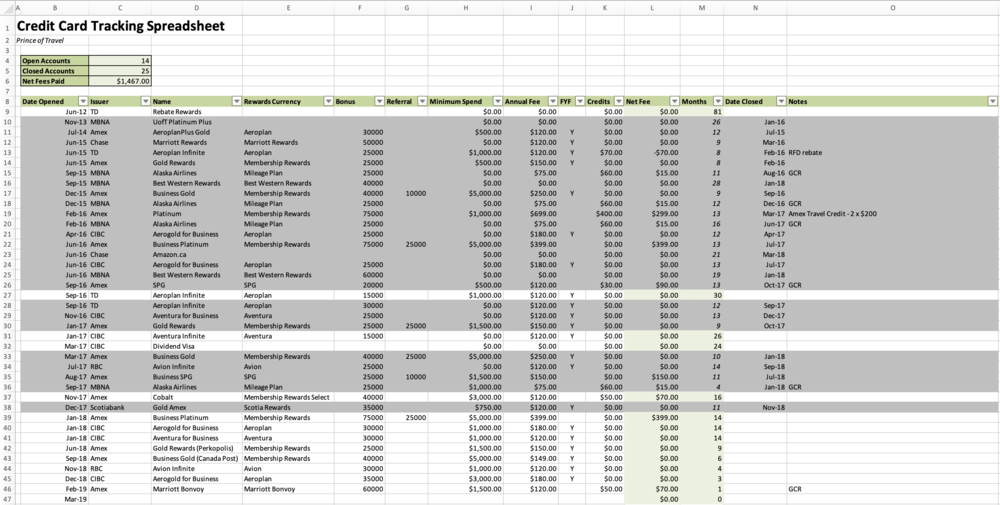
Each row on the spreadsheet represents a separate credit card account, while each column provides information of a certain type.
Let’s run through the various columns of the spreadsheet and the information that they display, starting from Column B at the left. The first 10 columns require you to input information relating to each credit card you have:
-
Date Opened (Column B): The month and year in which I opened the credit card
-
Issuer (Column C): The financial institution that’s issuing the credit card
-
Name (Column D): The name of the credit card (e.g., Business Platinum, Aeroplan Infinite, etc.)
-
Rewards Currency (Column E): The rewards currency associated with the credit card (e.g., Membership Rewards, Aeroplan, etc.)
-
Bonus (Column F): The number of points, in the rewards currency specified in Column D, that’s earned as a signup bonus as part of this credit card application
-
Referral (Column G): The number of points, in the rewards currency specified in Column D, that’s earned as a referral bonus for referring TO this card (typically only used for Amex self-referrals)
-
Minimum Spend (Column H): The minimum spending threshold within a specified period (typically the first three months) that’s required in order to attain the signup bonus
-
Annual Fee (Column I): The annual fee on the credit card
-
FYF (Column J): Whether or not there’s a first-year fee waiver on the credit card offer; if so, a “Y” is entered for “yes”
-
Credits (Column K): Any credits or cash-back that you earn as part of applying for the credit card, such as Great Canadian Rebates, the Amex Platinum $200 travel credit, etc. (details are specified in the “Notes” column at the end)
Then, the next two columns are automatically populated based on your inputs:
-
Net Fee (Column L): The net out-of-pocket spend as a result of applying for the credit card. If you entered “Y” in Column I (indicating a First Year Free offer), this column will simply reflect any credits or cash-back you earned in Column J. If the card wasn’t First Year Free, then this column will take the annual fee in Column H and subtract from it any credits indicated in Column J.
-
Months (Column M): How many months your credit card has been open? A rather complex Excel formula calculates the difference in months between when you opened the credit card and the present day.
Moreover, if you’ve closed the account (as specified in the next column over) then this column will stop counting, and will reflect how many months you had the credit card open over the course of its life.
The formulas for these two columns should populate automatically when you add a new row, but in the event they don’t, you can simply drag them down from the rows above.
When you close a credit card, you enter the date in Date Closed (Column N), and the month and year of the closure date will be displayed here. This value is then used to calculate the number of months that the credit card has been open back in Column M.
There’s also conditional formatting set up here, so that if a value is entered in Column N (i.e., the credit card is closed), then the entire row becomes greyed out to signify a closed account. If there is no value entered in Column N (i.e., the credit card remains open), then the row is displayed normally.
Lastly, there’s Notes (Column O). This is the place to put any notes that are relevant to the account, such as the source of the credits or cash-back you entered in Column K. You could also use this column to record any details about retention offers, or really any details that you think are relevant to keep track of.
Credit Card Tracking Spreadsheet: Features
Up top, there are a few “quick facts” about your overall credit card history, including the number of Open Accounts, the number of Closed Accounts, and the total Net Fees Paid. These cells simply draw upon the information you’ve provided in the input field below.

-
Open Accounts: Takes the total number of accounts (based on the number of values in Column B, Date Opened) and subtracts the number of closed accounts from below.
-
Closed Accounts: Takes the number of values in Column N, Date Closed.
-
Net Fees Paid: Takes the sum of values in Column L, Net Fee, and thus captures all the First Year Free offers and cash-back / credits you’ve earned
Note that for the purposes of the Net Fee column and the Net Fees Paid indicator, the spreadsheet assumes you’re cancelling the card after the first year, and thus doesn’t capture any annual fees you pay beyond the first year.
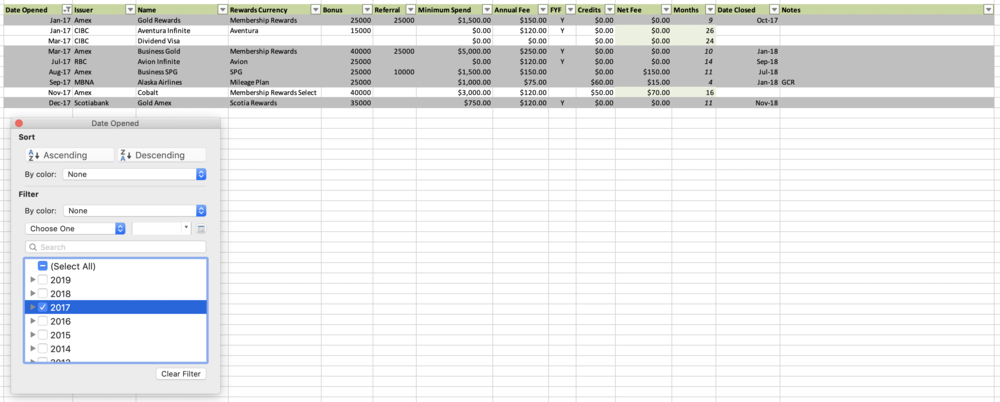
You can also use the drop-down filters in the title row of the table (Row 8) to filter the list of credit cards based on certain criteria. For example, you could filter for all the bonuses you earned in 2017:
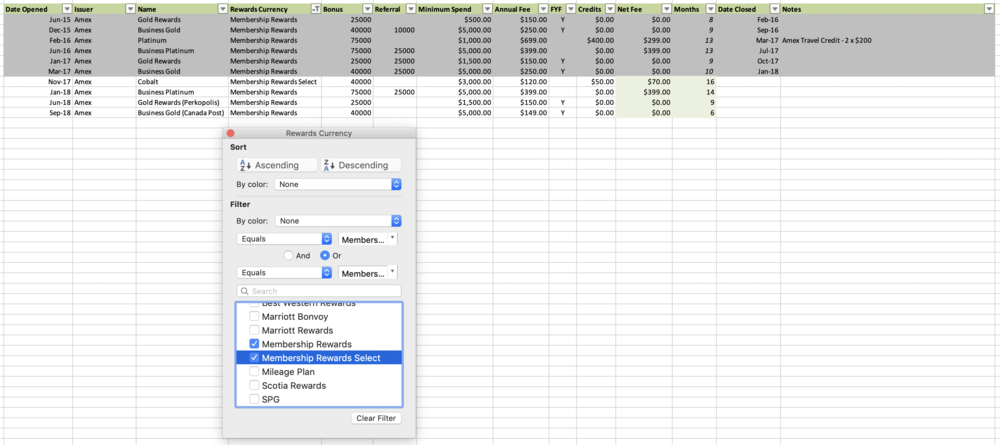
Or you could filter for all the bonuses of a specific rewards currency you’ve earned over the years:
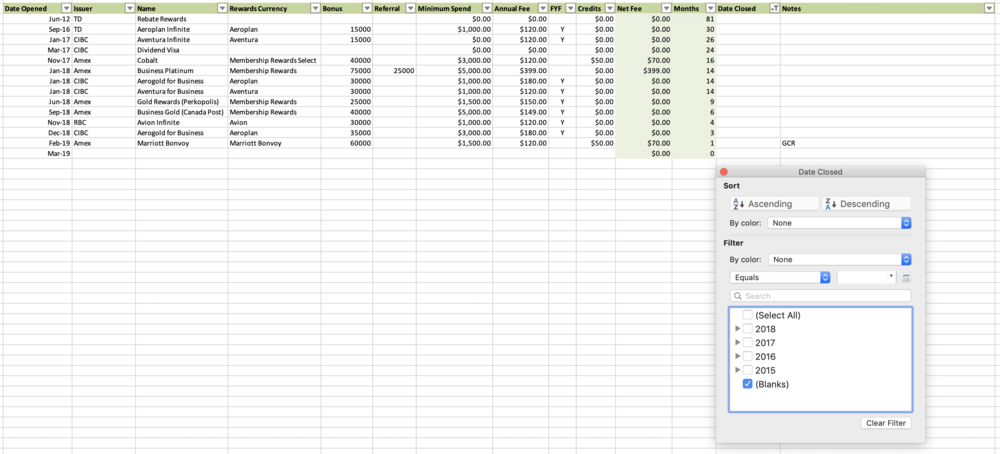
Or you could filter out all the closed accounts for a clean view of all the credit cards you currently have open – perhaps in order to keep track of which ones you’ll need to be closing soon:
Lastly, you’ll notice that the spreadsheet is all on one tab (which is labelled “Canada”). Indeed, I like to keep separate tabs for different credit files, you could duplicate the tab for your US credit card portfolio, or for keeping track of your partner’s cards in two-player mode, etc.

Conclusion
That’s basically all the features in the spreadsheet, but I encourage you to download the file and play around with it in order to get a feel for how it works. Feel free to adapt the spreadsheet (add extra columns or delete unnecessary ones) to suit your own needs as well. I hope some of you find this helpful as you look to stay focused and organized while pursuing the many excellent signup bonuses out there.
This spreadsheet has served me well over the years as a clear and easy-to-maintain picture of my credit card portfolio, although I’m sure there are Excel whizzes out there who keep far more comprehensive spreadsheets than my own.
I’d love to hear about your own spreadsheets if you do keep one yourself, and if you have any ideas on features that would be useful if added to my spreadsheet, I’d love to hear those as well – who knows, if there’s demand for it, we could turn this into a nice new resource for Prince of Travel readers!





Hey Ricky – any chance of fixing the link?
Really useful: thank you I just added droo down menus for the main financial institutions and points programs. Suggestion: are there common bonuses outside of points, such as companion passes, that are worth tracking lest we forget?
Quite possibly, yes. Look out for a refreshed edition of our spreadsheet coming soon that should have a lot more features (Josh is much more of an Excel whiz than me).
It should be working now!
Hi Ricky, the link is still broken. Can you please fix it? Thank you!
Should be working now.
Link appears to be broken 🙁
Sorry for that, it should be fixed now.
Still not working for me.
Try again now?
Hi Ricky, great column and super-useful. Any reason to/not to track two users in the same spreadsheet? ie., do you keep yours & Jessica’s together, or in a separate spreadsheet? Thanks, Patti
I find it more useful to keep track of different individuals in separate tabs in order to assess each person’s credit history independently. This way I can see my own oldest credit account, how many Amex cards I have, etc. and then switch over to Jessy’s to see hers.
Great post Ricky. For the Net Fees Paid formula, does it account for annual fee renewals if you keep a card for longer than the first year? I noticed you’ve had the AMEX Cobalt since 2017 – so wouldn’t your net fees paid be at least $140 by now?
Alas, it does not. The spreadsheet assumes you are cancelling the card before the first year is up to avoid the second year’s annual fee.
I suppose the functionality could be added using the Months variable, though.
Nice handy spreadsheet, I have something very similar. I also have 4 different columns besides the ones you have that I find handy.
Column 1 – By when I have to meet the minimum spending requirement for the sign up bonus
Column 2 – a formula that counts down how many days I have left to meeting the minimum spend requirement to get the sign up bonus
Column 3 – the actual minimum spending amount I have to spend to get the sign up bonus
Column 4 – a formula that keeps track of how much I have already spent subtracted from the minimum spending requirement to get the sign up bonus. This number basically tells me how much more I have to spend on this particular card before I get the sign up bonus.
Very smart additions!
Going to try it out. Thanks!
Thanks for the spreadsheet! I am trying to make my list but how do I find out the dates that I opened my card that was opened years ago? And do you use the date you applied for the card, or the date you received the card and activated it?Thanks
You can use Creditkarma.ca to get your free credit report there. It uses information from Transunion (not Equifax), but is free to use and you can get a new report online weekly for no charge. It will list your accounts and the dates opened.
I cant remember which blog I read this and never confirmed this but I recall reading that the countdown to meet your minimum spending requirement in order to get the signup bonus is not from when you receive your new credit card and call in to activate it but from when you applied and got approved. This means that the 5-10 business days that it could take for your credit card to arrive gets counted towards the time you have in order to meet the minimum spending requirement.
Something to keep in mind and maybe Ricky or someone else can give a definite answer on when the clock starts
It is from the date your card is approved as this is when the account is "opened", NOT when you receive or activate the card.
Thanks Ricky!
You have 14 open accounts – are these all yours or spouse’s / parent’s etc?
The spreadsheet is not exact… but yes I have roughly that number of accounts under my own name.
Wow!
Maybe it is the common believe – but isn’t that many cards kill your score??
Or in other words – can I apply for as many cards in any given period of time – as long as I stick to the 6/3 rule?
Contrary to popular belief, having many credit card accounts (or other forms of credit accounts) on their own do not beat up your score if you are paying bills in full and on time, aren’t using too much of your total granted credit, etc. Ricky did a post on this exact topic here: https://princeoftravel.com/blog/all-about-credit-scores
I actually took some time a few weeks ago to create my own (aka modify one I found online) and was curious as to what you had.
Like Nicolas below, I have the credit limit column that adds it all up to see the overall amount of credit I have.
Another field that might be useful is the amount of days since you closed the account. Great to quickly see if it’s too soon to reapply or just right.
Otherwise, I like the clean look of yours and may actually migrate my info at a later time.
Excellent spreadsheet Ricky! I have the credit limit of each card in another column in mine so it could be a useful to add to yours.
Great idea!
Thanks! Going to slightly tweak mine with some of your features.
Tremendous help Ricky! Very much appreciated.