Air Canada and Switch Health have just launched a series of new testing options to simplify Canadian travellers’ journeys on international trips.
Earlier this summer, I had the opportunity to trial the Switch Health RT-LAMP Test Kit to satisfy Canada’s pre-entry molecular test requirement on my way back from Switzerland, where I was a participant in the Air Canada Race. Here’s my experience using the portable RT-LAMP tests.
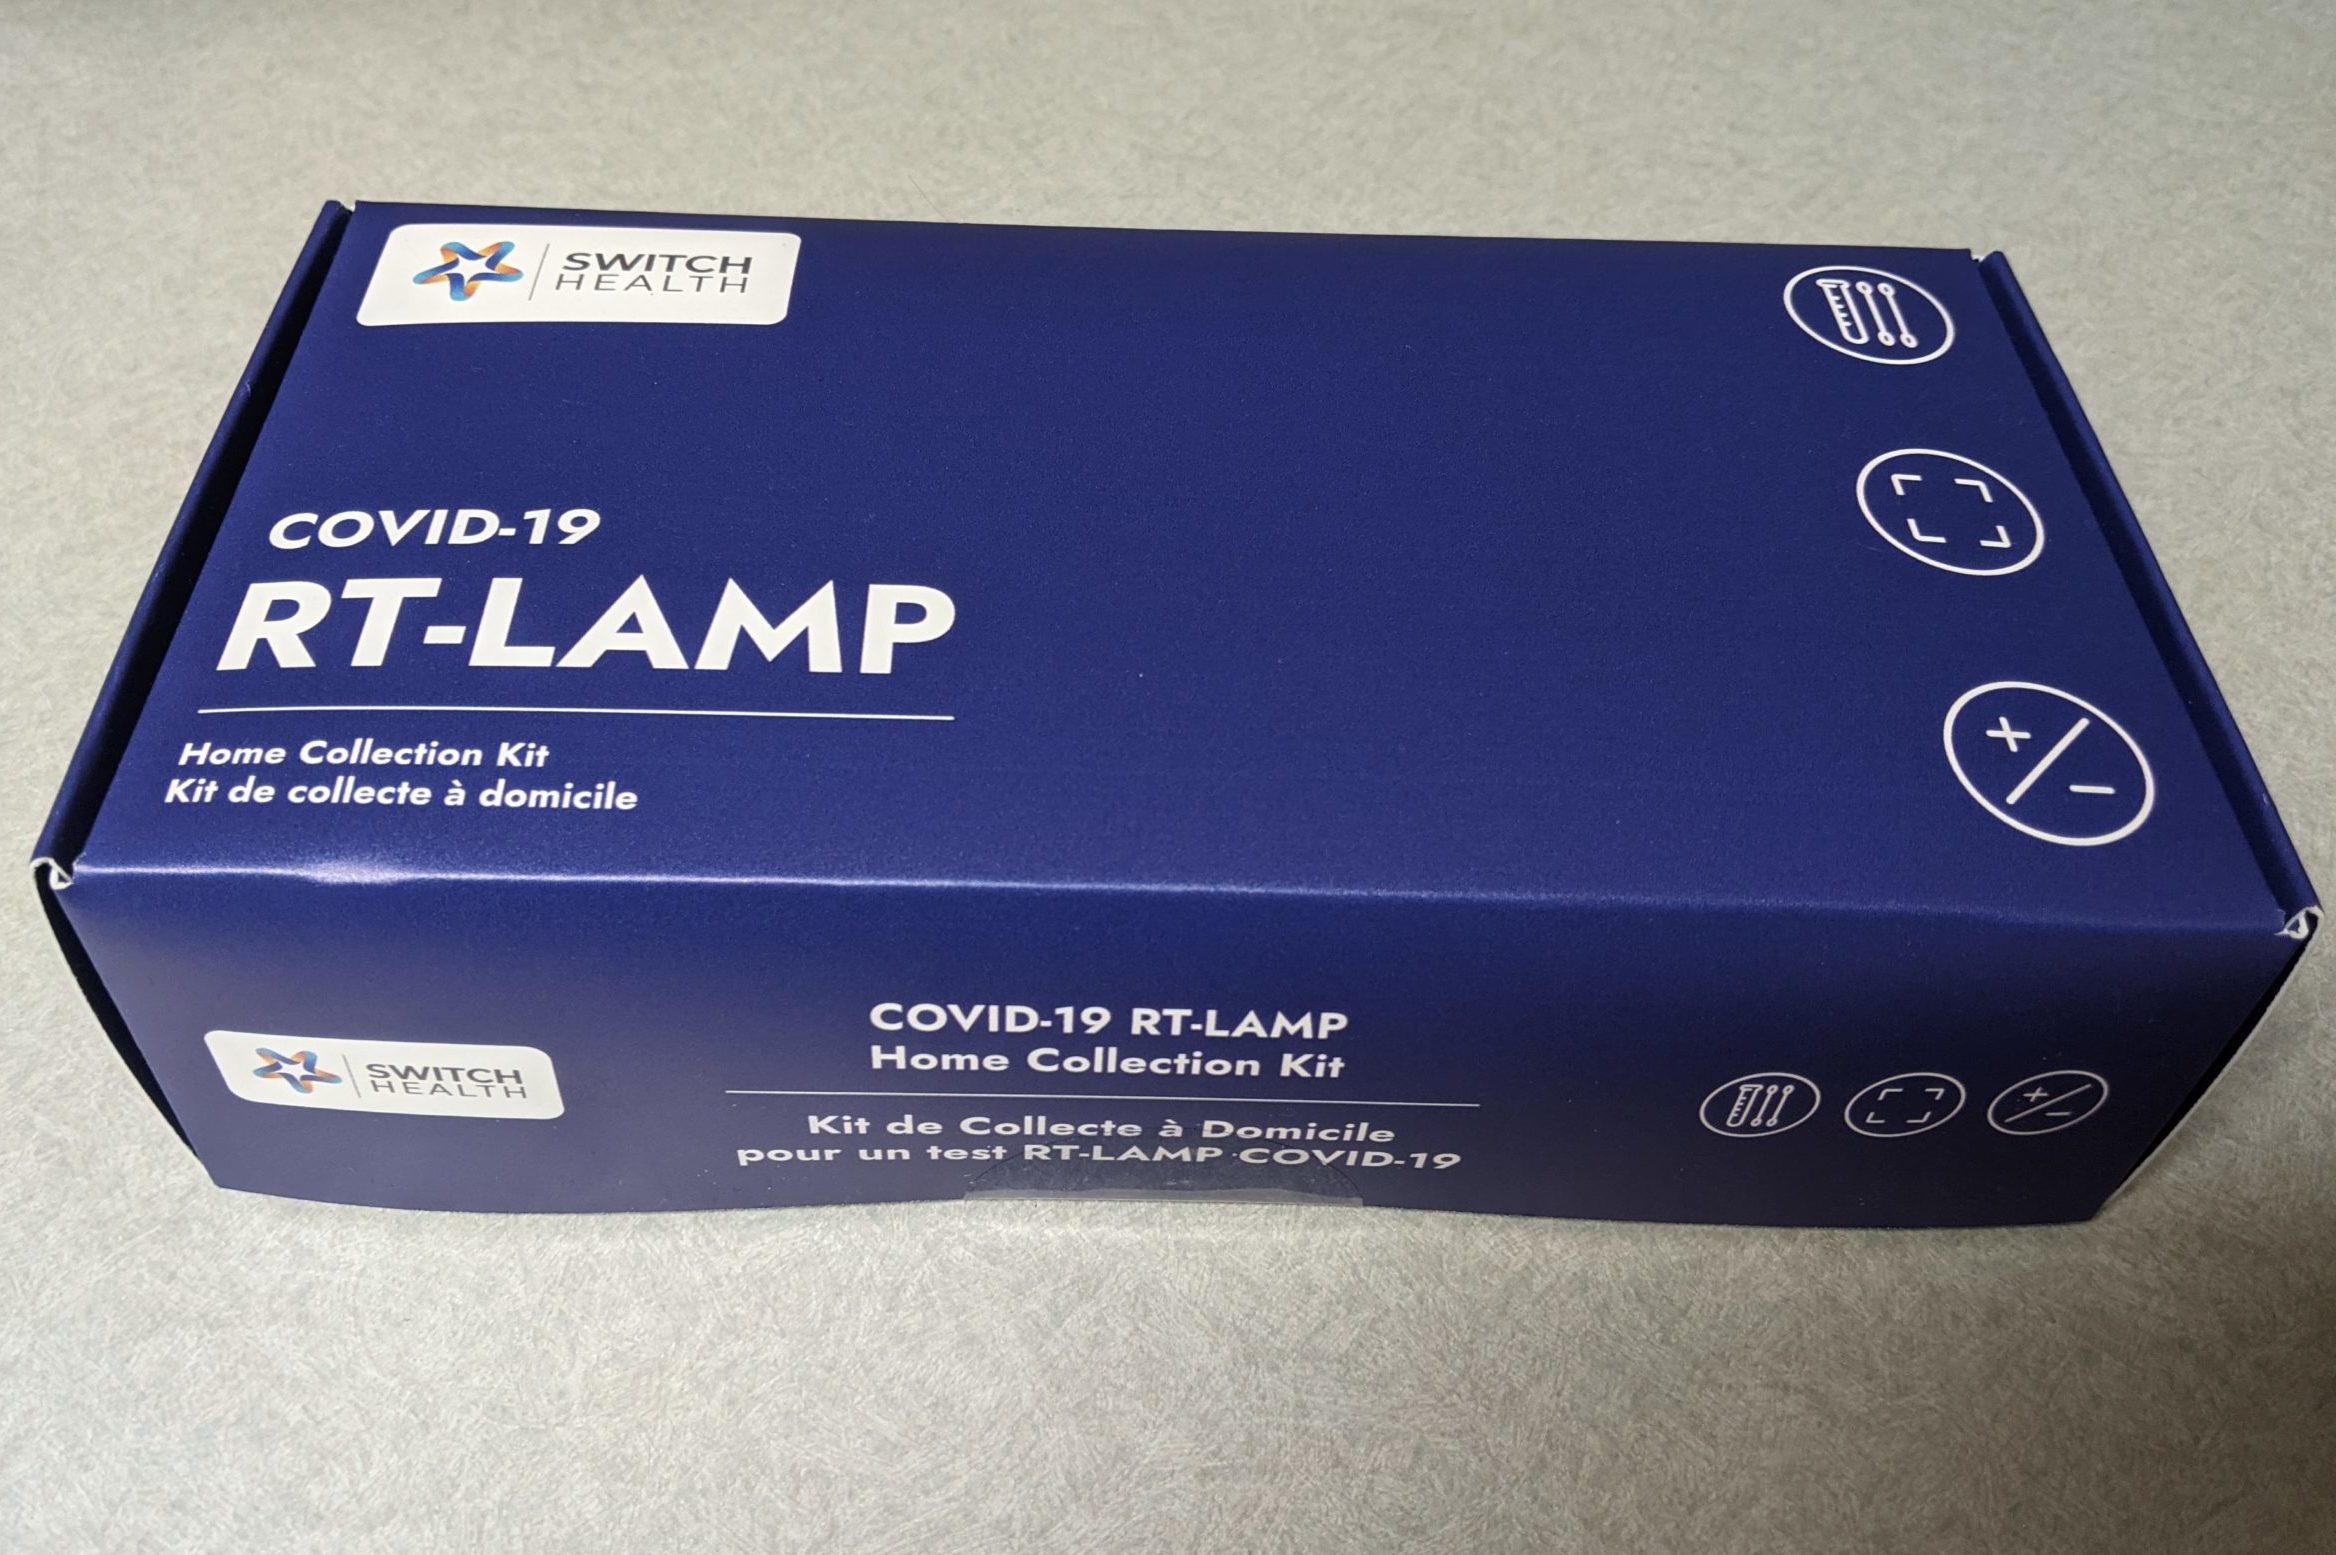
Switch Health RT-LAMP Test Kit
The Switch Health RT-LAMP test is a COVID-19 test, approved by Health Canada, that is done remotely under the supervision of a Canadian health professional on a video call. All you need is a reliable internet connection and the test can be done anywhere in the world.
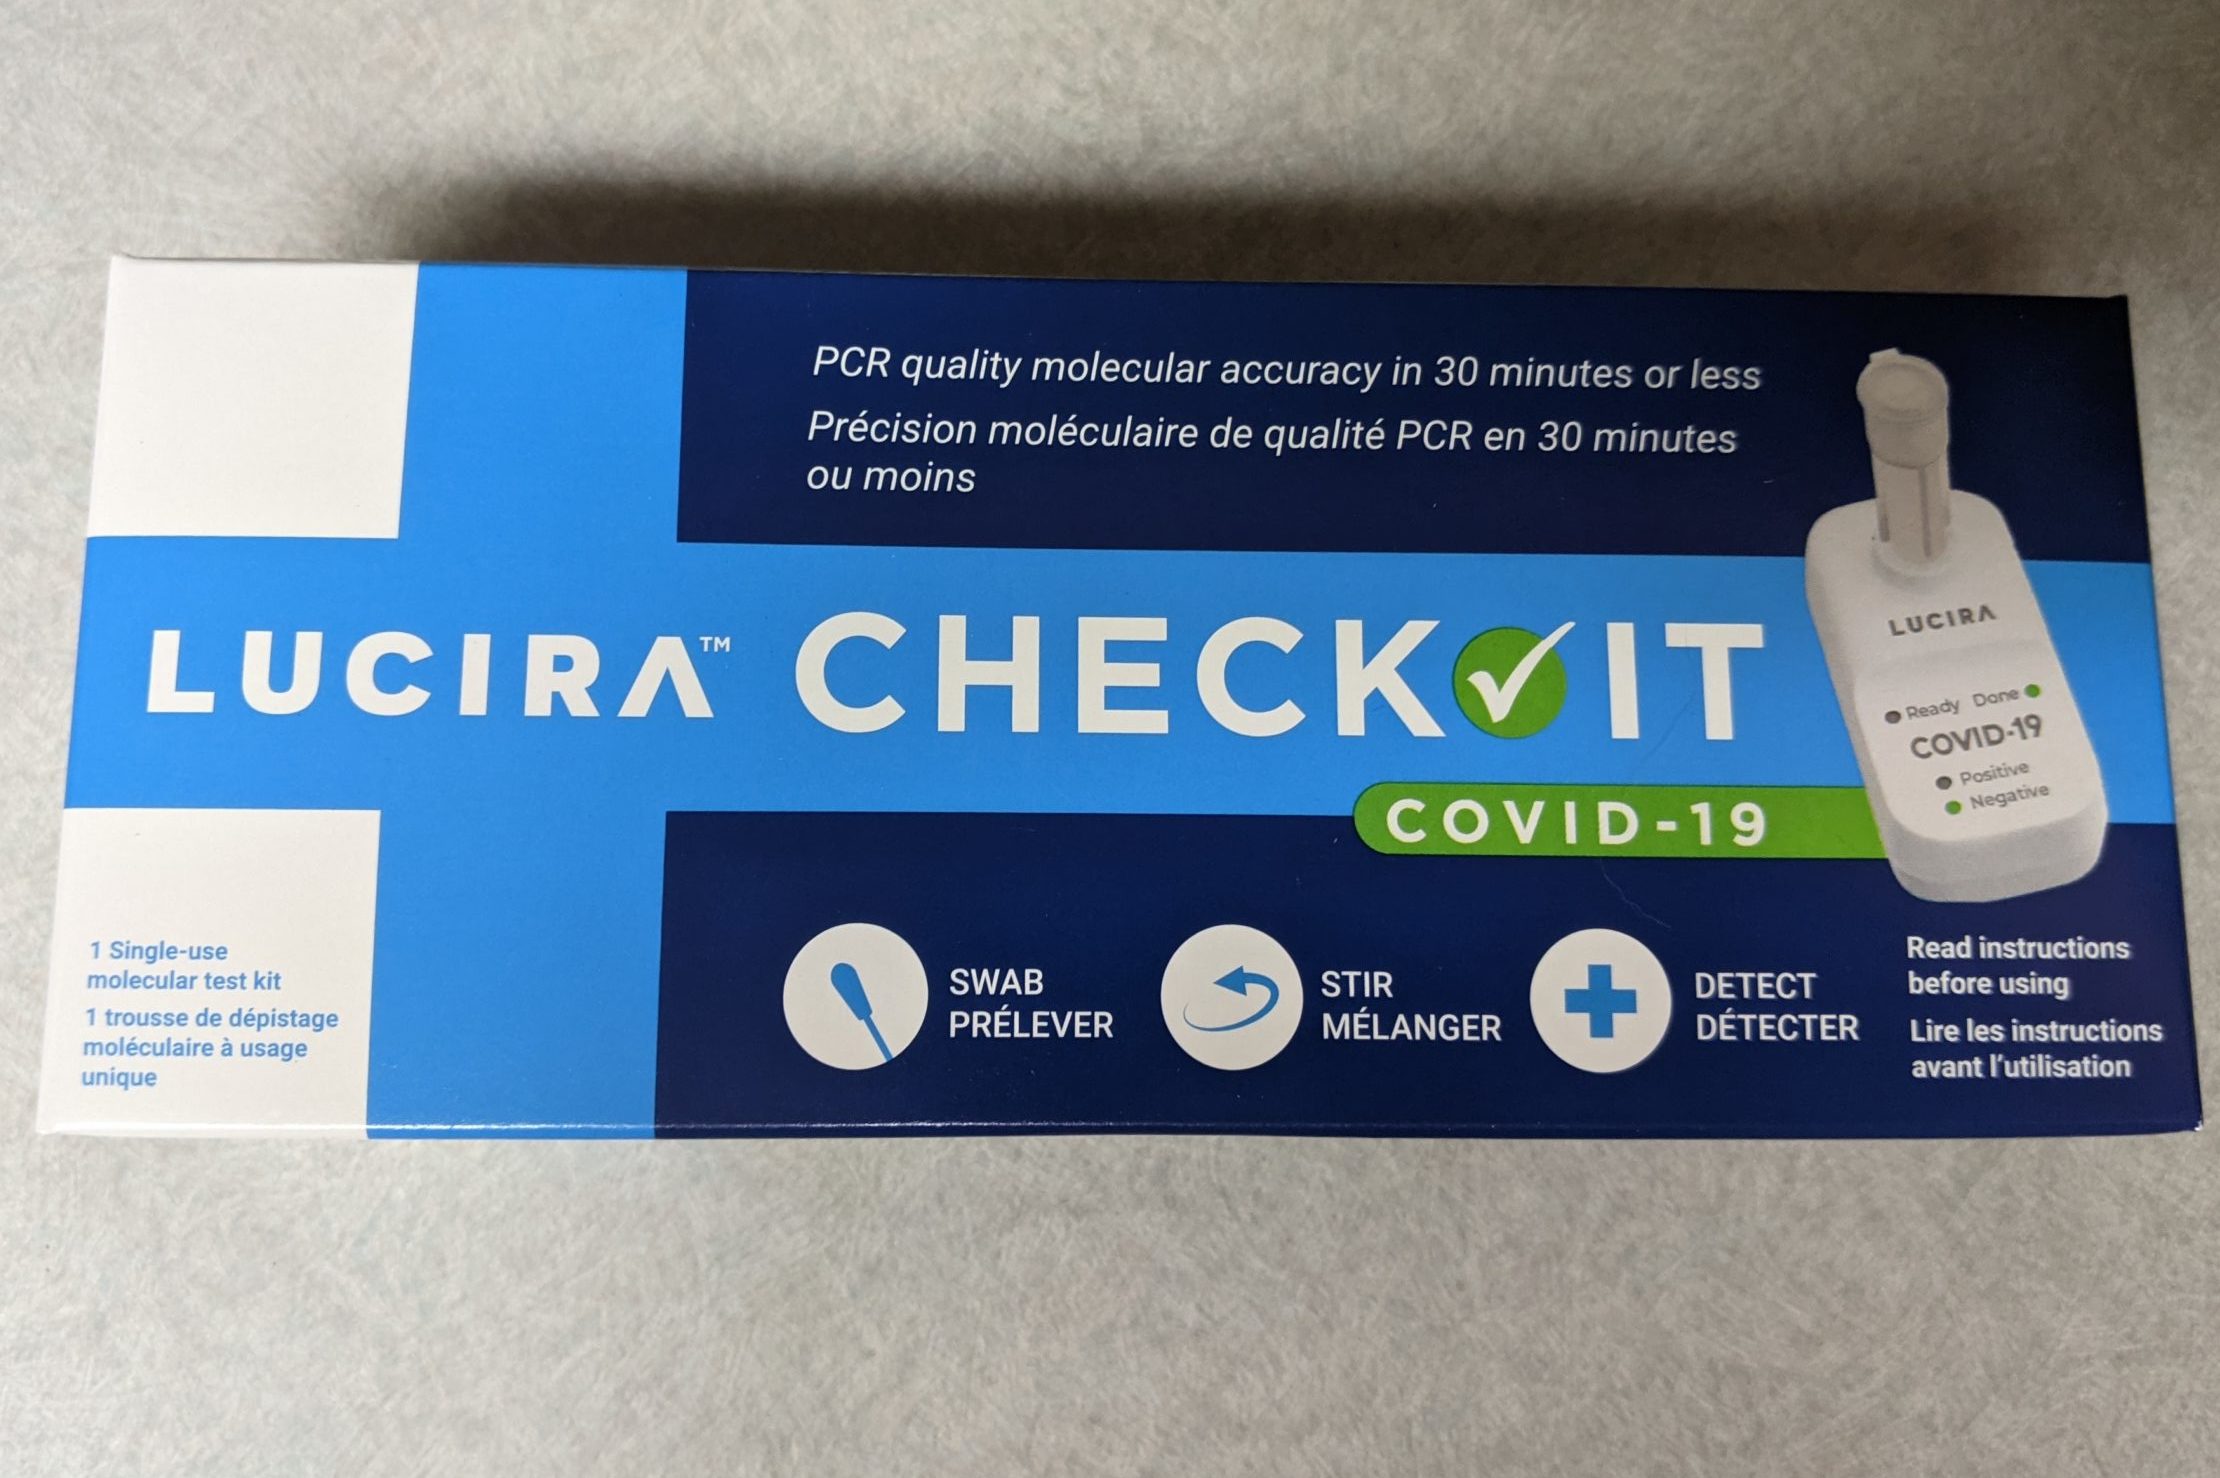
The actual test in the kit is a Lucira Check It COVID-19 Test Kit. It is approved by Health Canada to be used as an over-the-counter self-collection kit for people aged 14 and older, as well as for adult collection for children aged 2–13.
As you get ready to leave for your trip, you should save a bit of room in your bag for the test kit, which is about the size of a book. The kit contains everything you need for the test, as well as detailed instructions.
Inside, you’ll find:
- A nasal swab
- A test vial
- A test unit
- Two AA batteries
- A QR code unique to the kit
- Detailed instructions

Everything within the kit is labelled and easy to find.
Aside from the kit contents, you’ll also need:
- A mobile device with a camera
- An internet connection
- Valid government issued photo ID
- A clear, flat area for the testing device
- Clean tissues
- Hand sanitizer
- Around 45 minutes of your time
Taking the Switch Health RT-LAMP Test
The first step is to create an account with Switch Health’s ASMO portal, Switch Health’s proprietary telehealth platform. Through ASMO, you will register for an account, connect with a healthcare professional who will supervise your test, and retrieve your certified results.
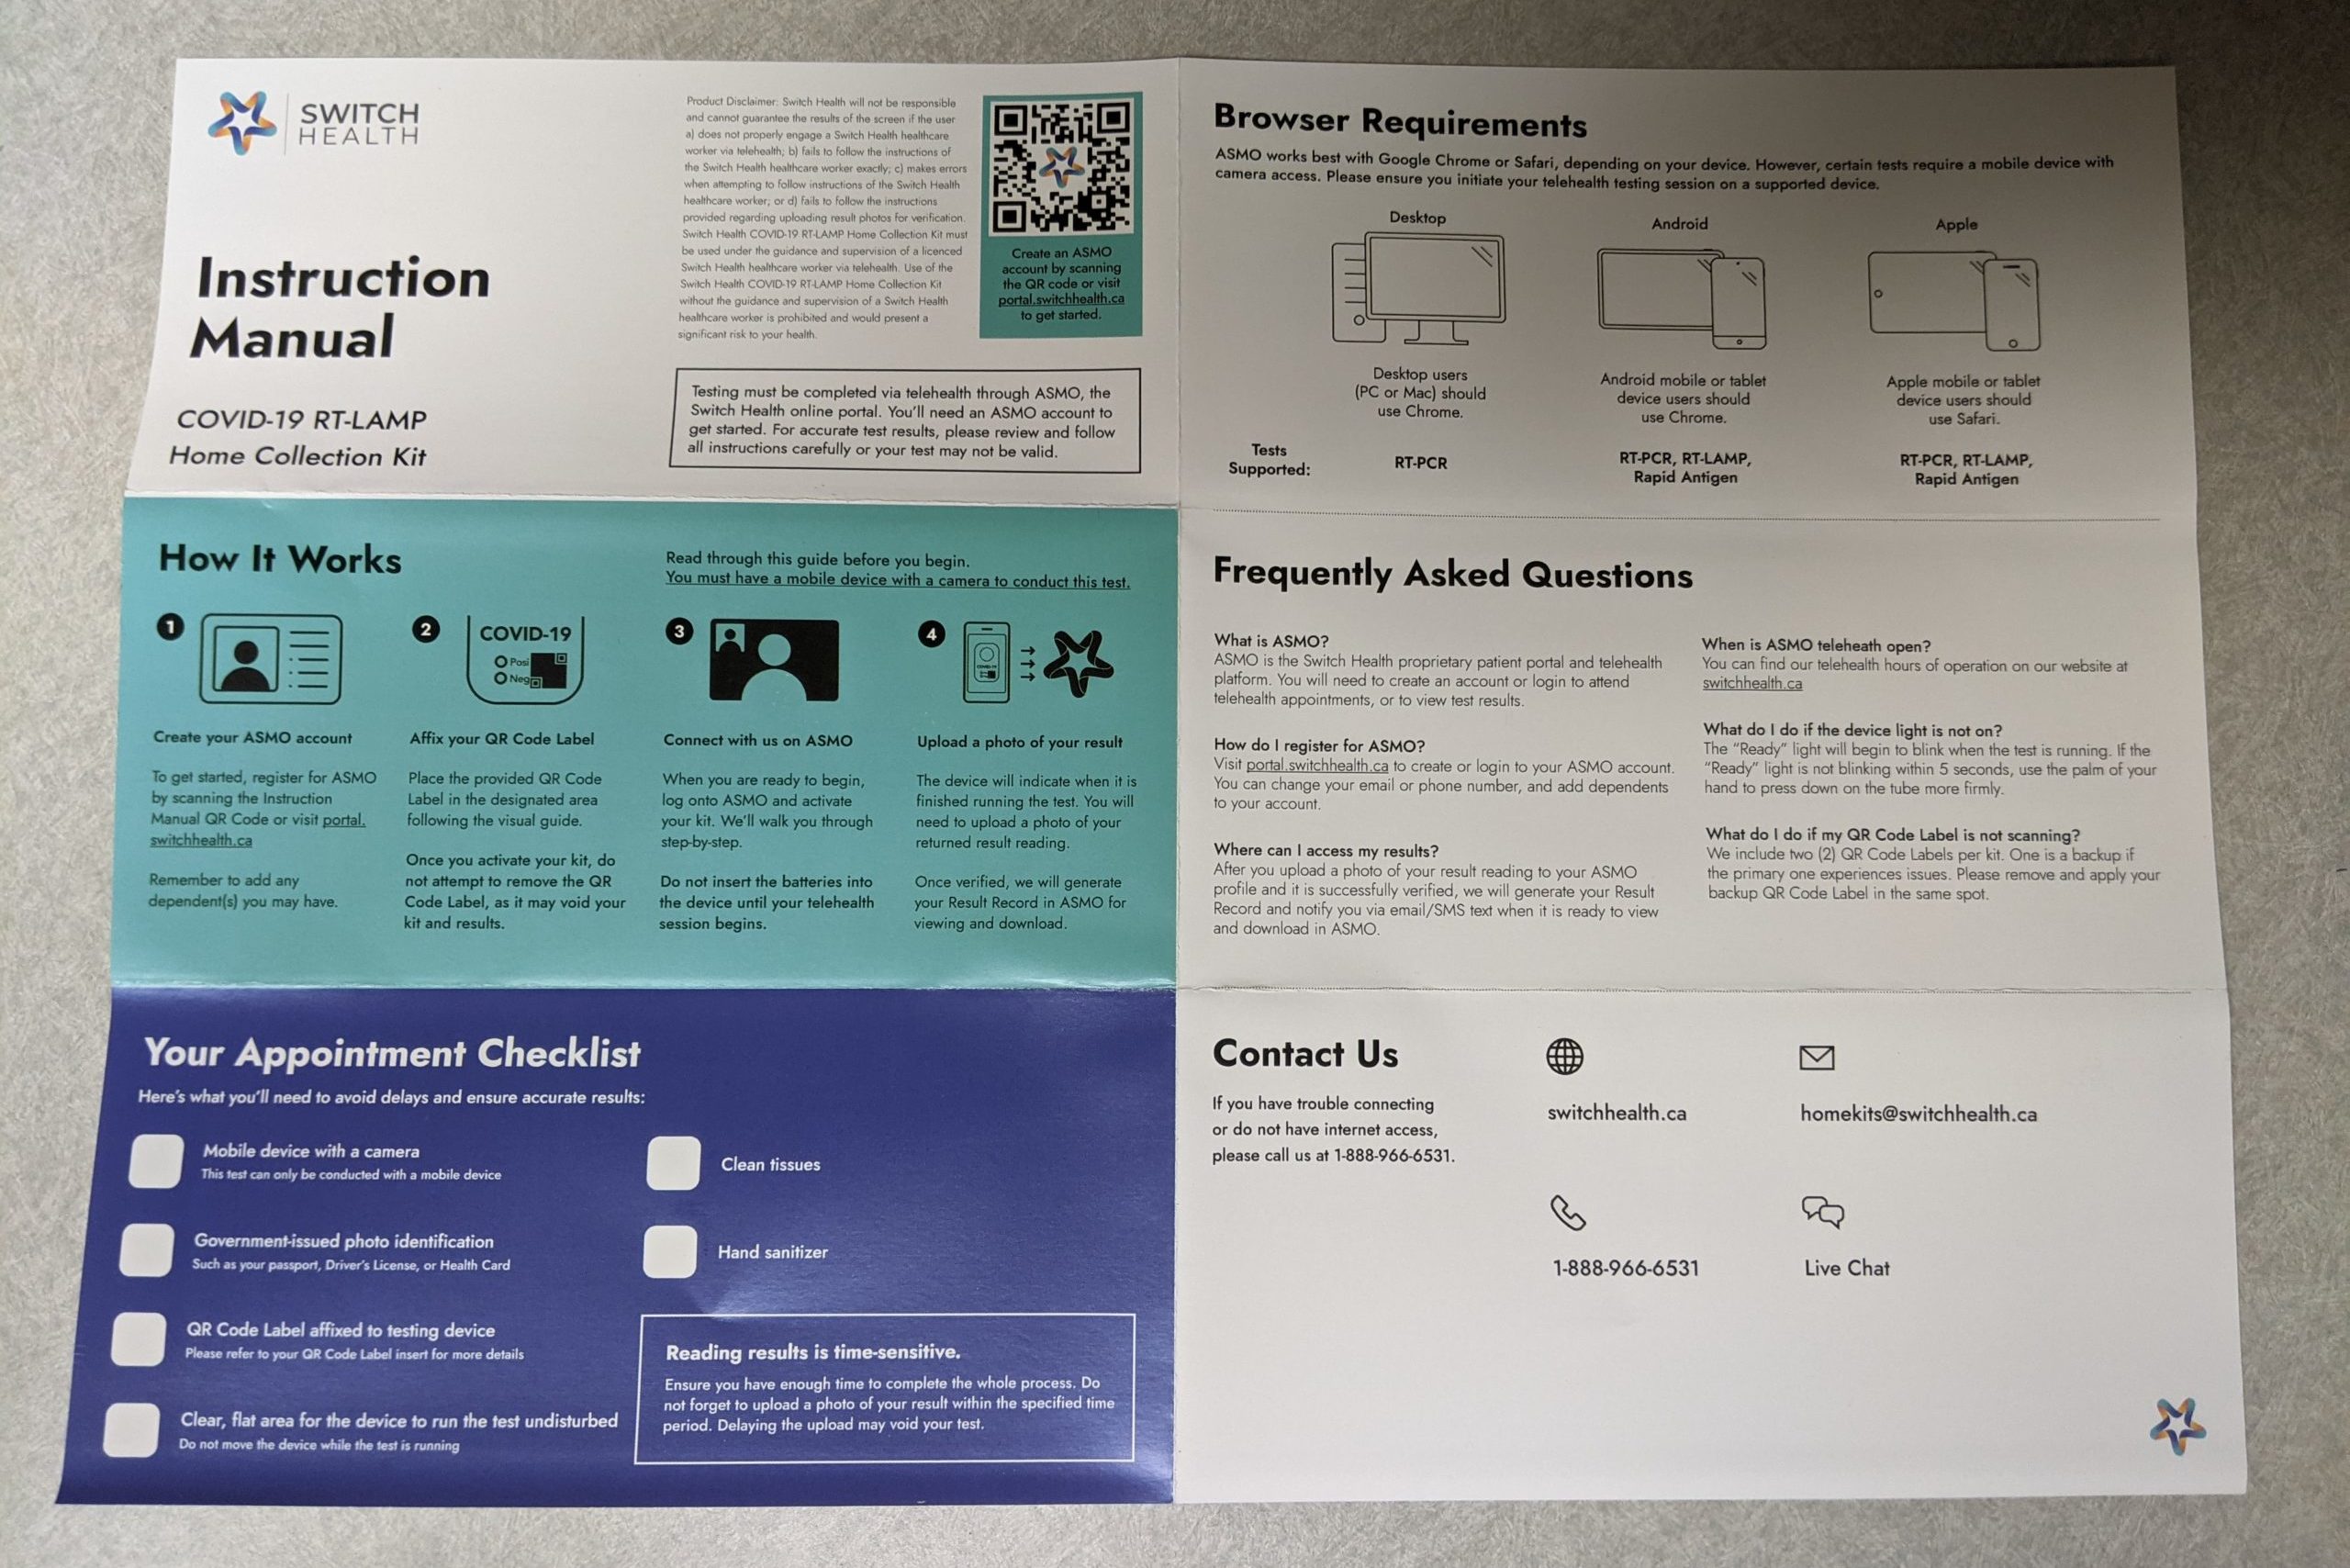
You can scan the QR code found in the instruction manual to create an account. Through this portal, you will register yourself and any other dependents for whom you will also register for an upcoming test.
Once you have your account set up, affix the QR code to the lower right-hand corner of the test unit. This QR code will be used to identify you and to certify your test results. Any attempts to remove or alter the QR code once it has been registered to you will void your results.
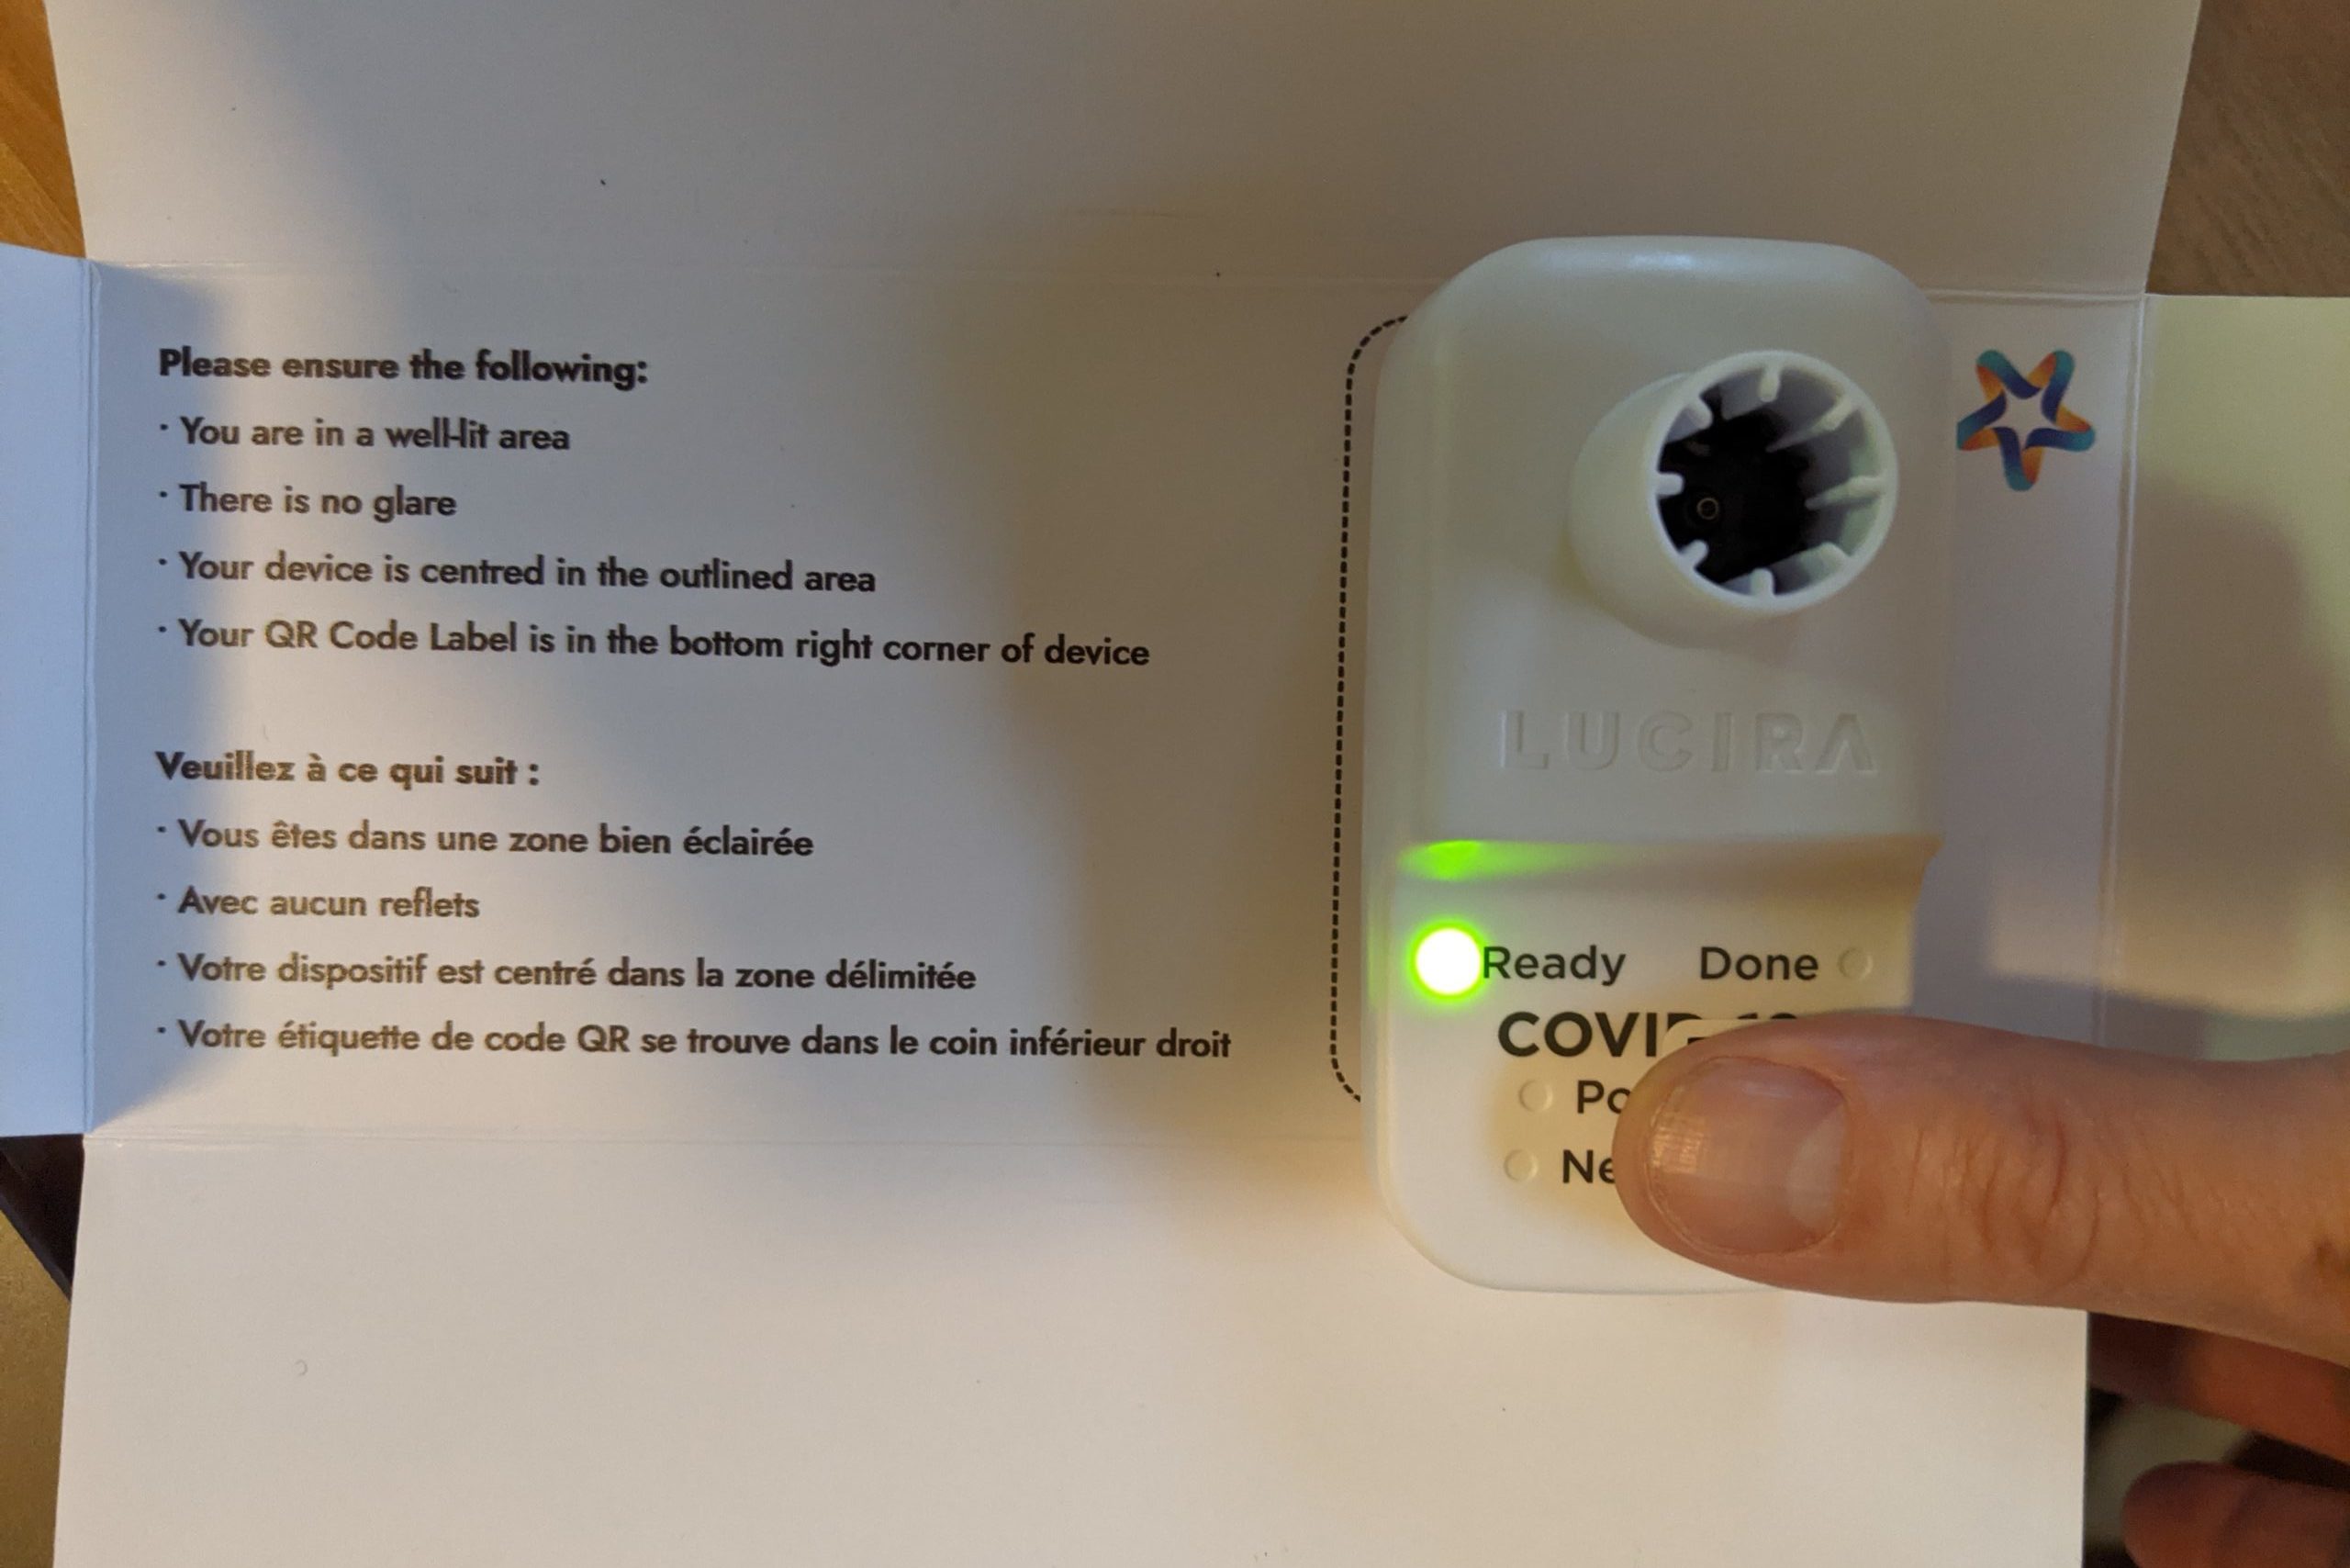
Once you’re ready to take the test, the next step is to connect with a Switch Health healthcare representative through the ASMO portal. The healthcare workers are available 24/7.
They will walk you through the activation of your kit, as well as guide you through the process from identification to testing.
For the actual test, you’ll need to insert the swab 2cm into each nostril for 15 seconds, moving it in a circular motion. My wife remarked that it was much less invasive than some of the brain-tickling PCR tests she’s previously had.
You then stir the swab in the purple liquid in the test vial for around 20 seconds. Once this is done, you can dispose of the swab in the included plastic bag, seal the vial, and activate the test by pushing down firmly until you hear a click.
The “ready” light on the test unit will begin blinking, indicating that the test is running. The video call will wrap up at this point.
Before generating a result, you must let the device run for 30 minutes until it displays a positive or negative test result.
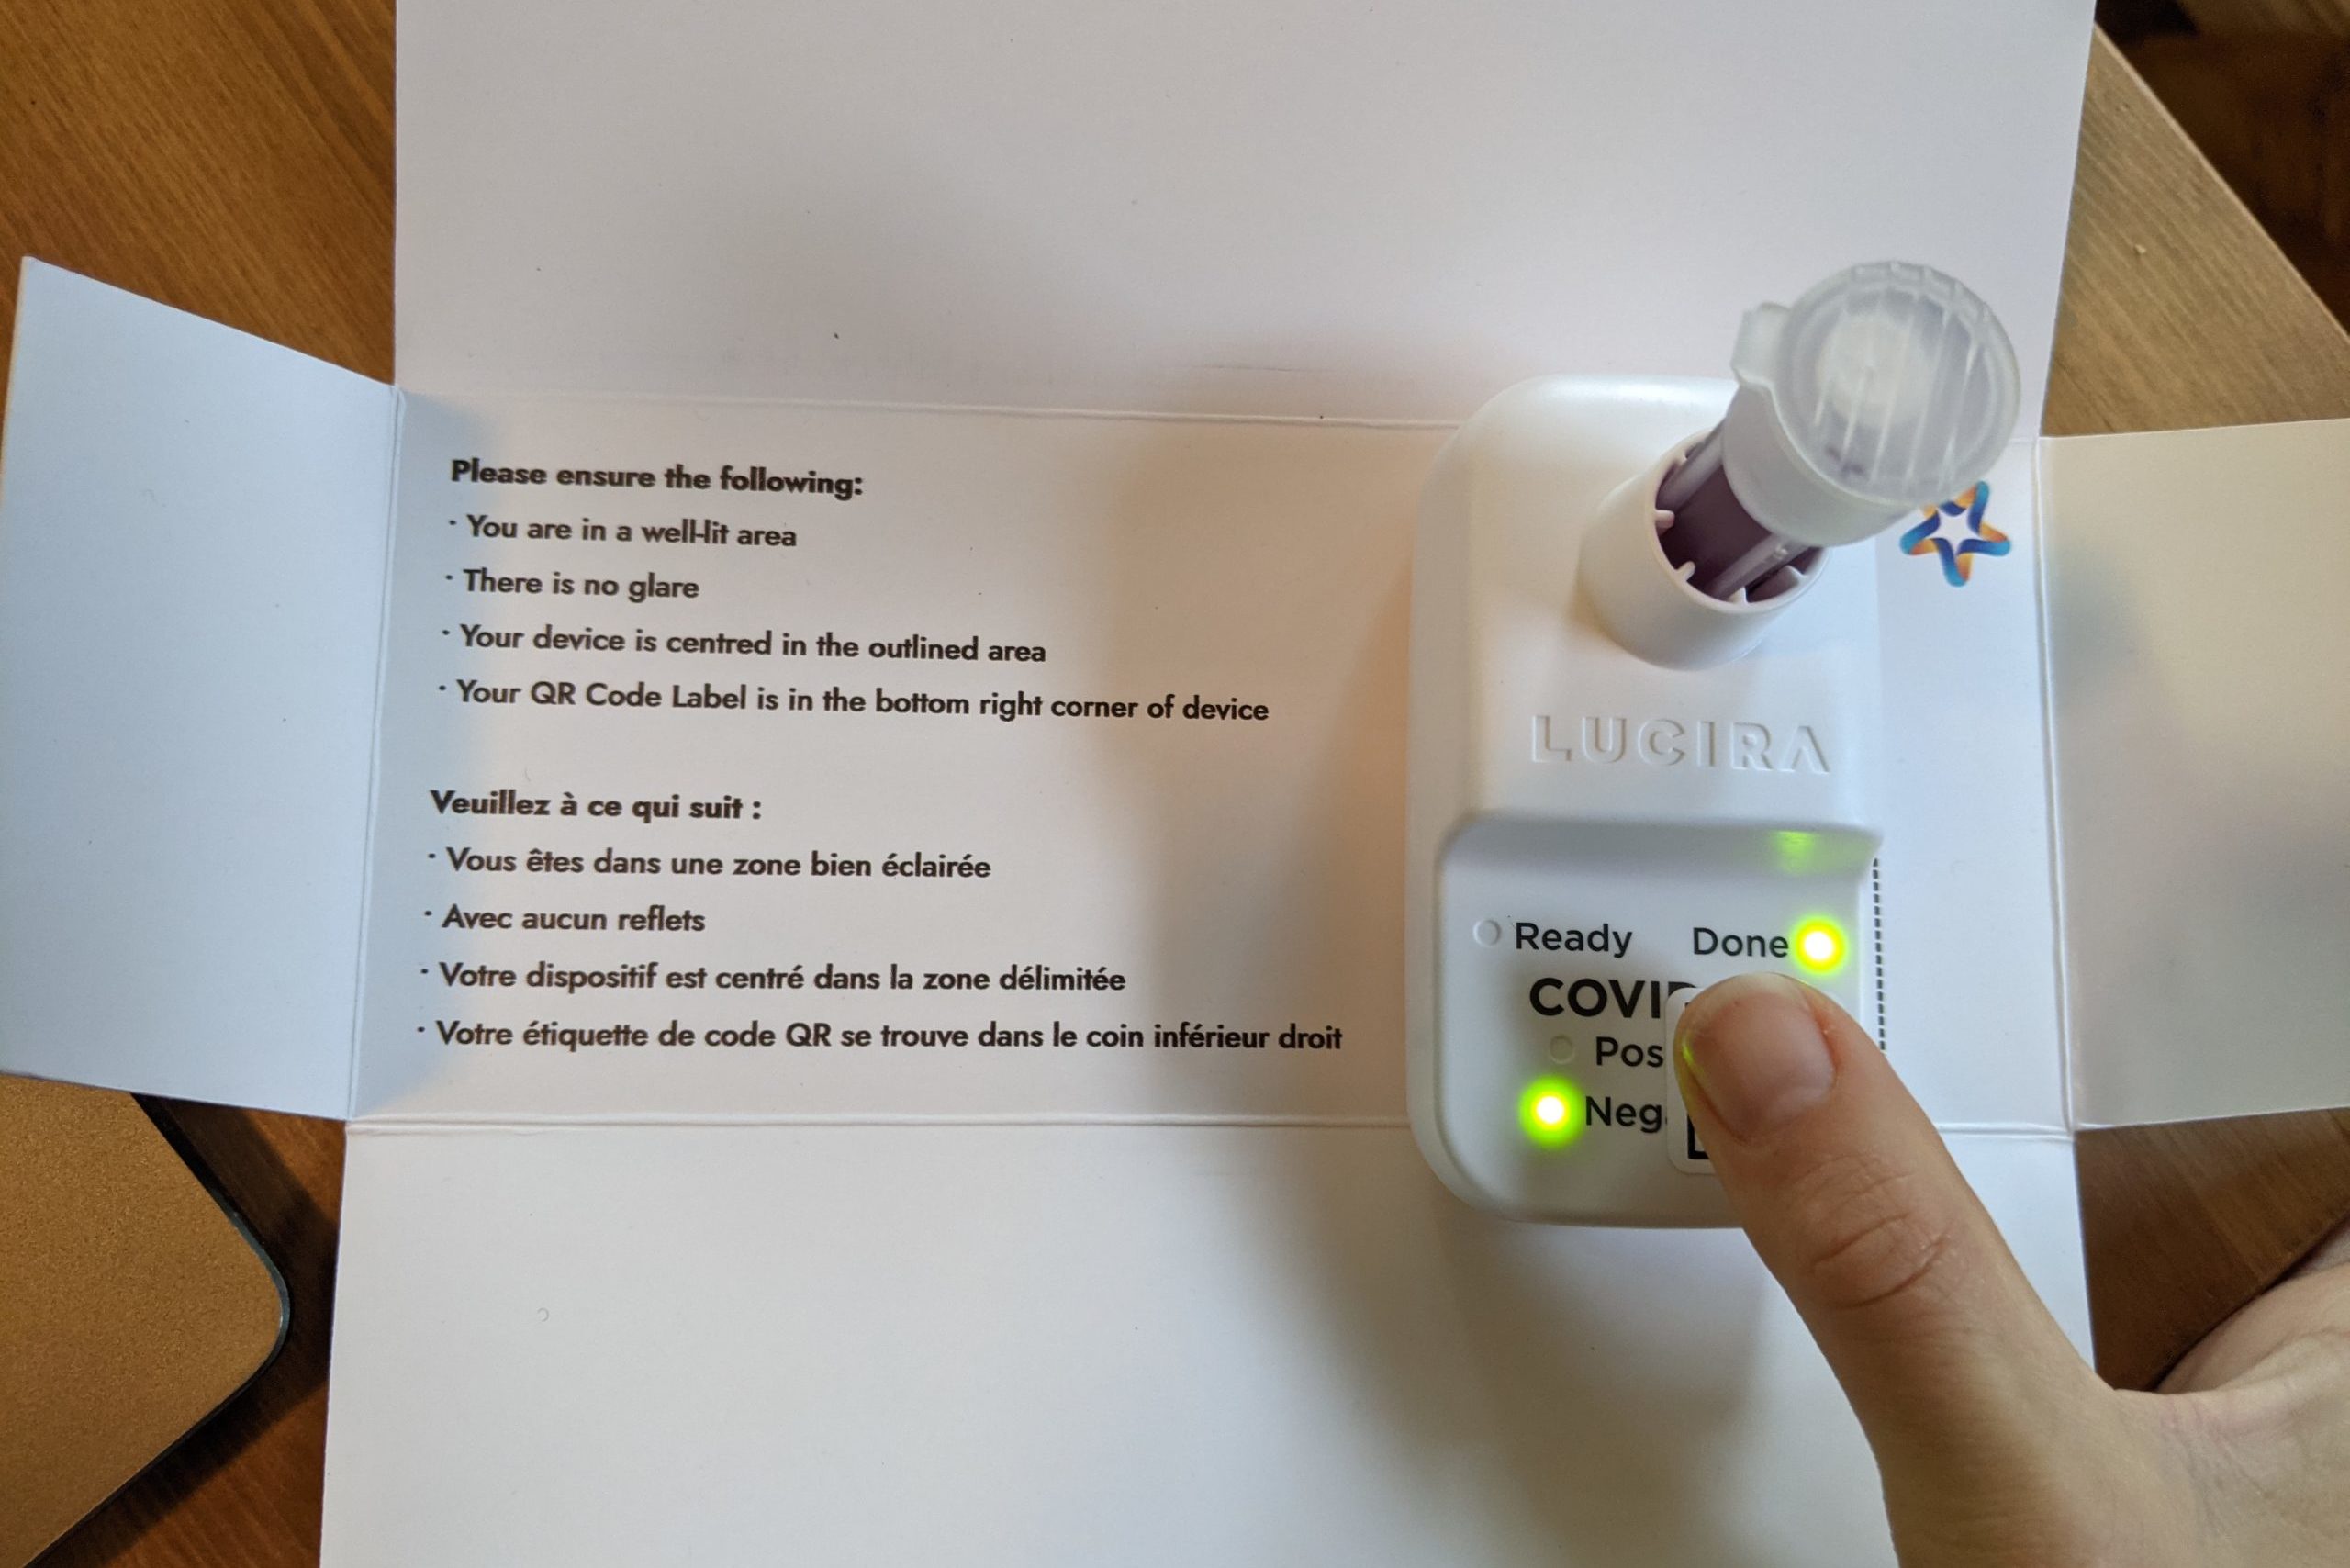
After half an hour, the test kit will display a solid green light indicating either a positive or a negative test result. The “done” light will also turn solid green.
Importantly, you must upload a photograph of the test result to your ASMO account within 15 minutes of it being displayed. This ensures that you will get a test result record as per their requirements.
You will also receive an email reminder to upload your result, so be sure not to venture far from your test kit after your online appointment.
Within minutes of uploading your result, you will receive an email informing you that your official test results are available. This is the document you’ll need to enter Canada, for example.
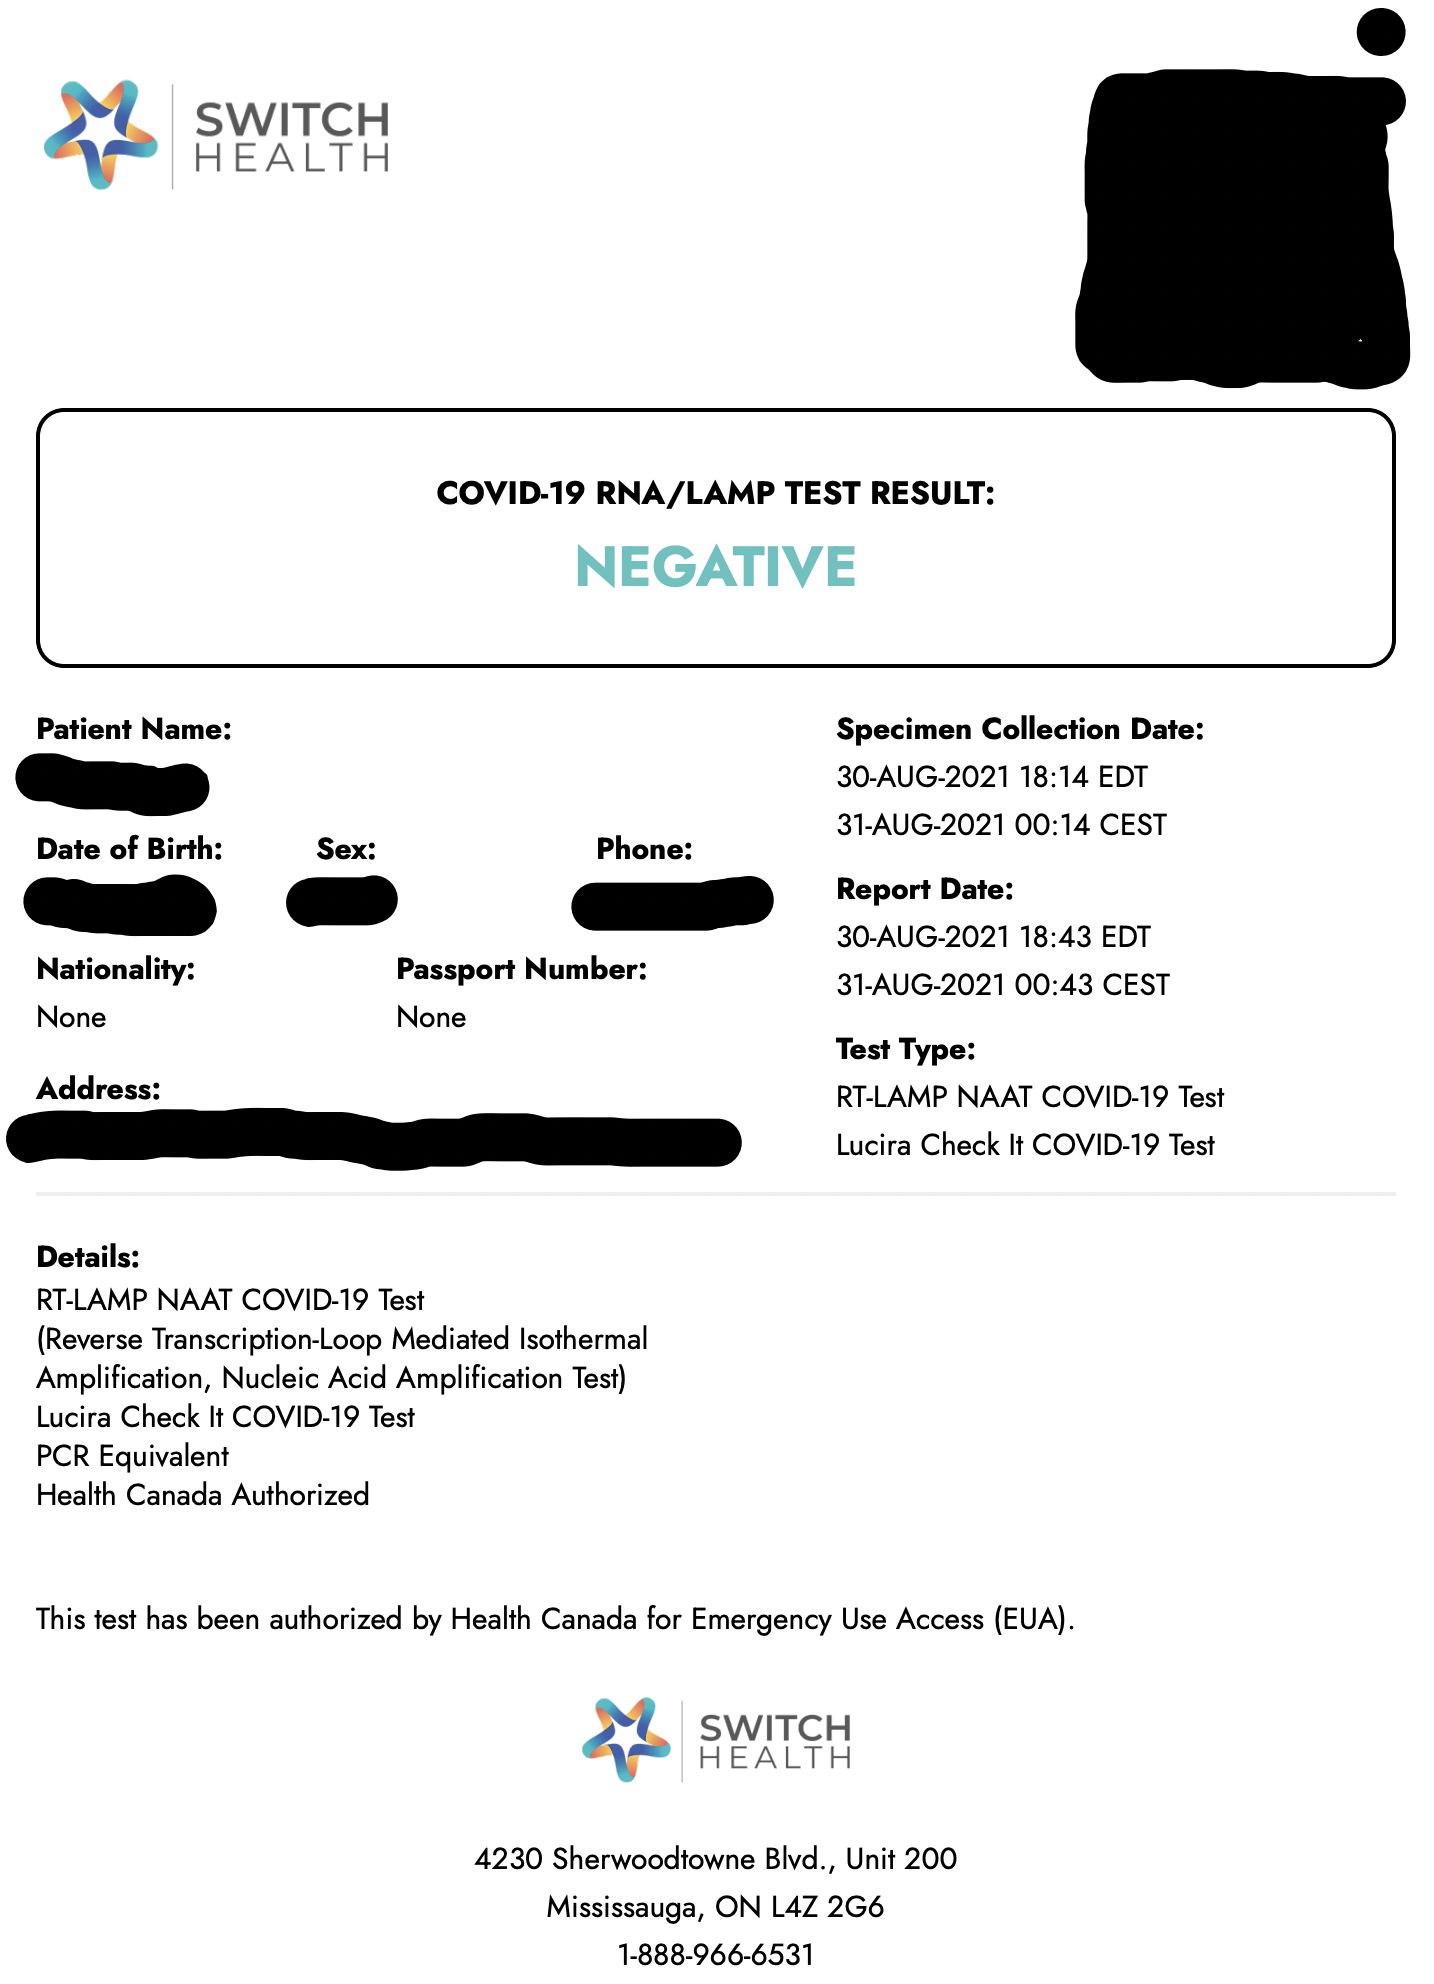
The letter displays all of the pertinent information about the test, including the time of collection, your personal details, and the details of the test. This time of collection is a very relevant data point, as many countries (including Canada) require tests to be taken within a specific amount of time prior to your arrival.
From start to finish, the process takes around 45 minutes. The actual video call lasts around 5–10 minutes; the bulk of your time is spent waiting for the test to run.
My Experience
I used this test on my trip to Switzerland at the end of August. Switch Health generously provided tests to all participants in the Air Canada Race.
My test needed to be done within 72 hours of my last direct flight to Canada, so I slotted some time on Monday evening in time for my flight on Thursday afternoon.
After preparing everything in my hotel room, I was connected with a healthcare worker on the ASMO platform in less than five minutes. She guided me through identification and the test.
For some reason, the microphone on my phone wasn’t working, so I communicated through the chat feature and through gesturing. It was probably a good thing that my microphone was down, though, because I wound up sneezing a lot during the swabbing. Apparently I have a very ticklish nose.
During the wait for my results, I enjoyed a local craft beer that I’d picked up for the occasion and got ready for an upcoming gala dinner that evening
As soon as my negative result appeared, I breathed a sigh of relief and uploaded a picture of the result and the test device with the QR code to the ASMO platform. Shortly thereafter, an official document with a unique QR code identifier was ready for download on ASMO.
I showed my proof of negative result and my vaccination card upon check-in at the airport. It was an entirely uneventful experience, which took away any worry that I had about travelling internationally for the first time since the onset of COVID-19.
Conclusion
The Switch Health RT-LAMP Home Collection Kit is a great product for Canadian travellers. It’s remarkably convenient, affordable, and Health Canada-approved, and it makes for a simple and worry-free testing solution for your return flight back to Canada.
For the foreseeable future, while Canada’s current pre-entry testing requirements are in place, leave some room in your bag for the RT-LAMP Home Collection Kit so you can enjoy more of your long-awaited holiday.







I absolutely do not recommend this product. The price is high (getting a test abroad almost anywhere in the world is cheaper) and the error rate is high (2/3 kits failed for my family). When contacting support I was offered a replacement kit but it could only be delivered to Canada or USA, which doesn’t help at all when you’re out of the country desperate for a test the night before your departure. What started as a purchase made for convenience turned into an absolute nightmare. When contacting support for a refund there was a whole month between responses and it was ultimately denied. I will never pay for Switch Health products again – the reliability is poor and the customer service is even worse.
Do you have to be on Wifi or can you just use your data service on your phone? I’m thinking less change of dropped signal or connection?
You should be able to use either, with data probably coming with less chance of a dropped connection.
Are there any current reviews from recent travels back to Canada – has the malfunction issue been fixed as I’m sure there were a lot of complaints?
Looking at the template of the Negative result, the only thing I see missing is the Address of the lab, unless that is what is blacked out on the top right?
I had a malfunction today with the LAMP home test kit and Switch Health blamed user error and wouldn’t give me a refund or replacement test. Wouldn’t recommend using this company.
Can’t say we had a good experience. Bought 3. We were only able to get one test through the process.
My colleague used one yesterday and the battery is still going 24hrs later which makes me question the accuracy of the companies statement that the battery only has 30mins life. With so many problems, it’s a wonder anyone uses the at home kits.
The part that’s blacked out is the QR code – the address of the lab is at the bottom of the document.
If I was to fly Qatar Airways – AUH-DOH-SEA-YVR do you know if I could use the RT-LAMP test, or would I need to get something else since transferring through the USA (It would be one ticket).
Can the rapid antigen tests from switch health be used to enter hawaii now ?
Indeed, as previous replier indicated, we just returned from Hawaii; going out from Canada to Hawaii, we chose to use the rapid antigen test kit which is more economical (two shots for $50), coming back, we use the RT-Lamp test which is about $150. The antigen test kit has expiry date in 2023 while the RT-Lamp test kit has expiry date in June 2022 so try only get it when you plan to travel. Arriving in Hawaii (Maui) was uneventful. Our trip was December 26/2021 to Jan 2/2022. Having the RT-Lamp kit was handy was local testing cost $250USD (four day turn around which is not useful for travel) and $250 USD for same day turn-around. Safe travel
https://www.gohawaii.com/travel-requirements
According to this, Hawaii has aligned its entry requirements with those of the CDC. If this is the case, then a rapid antigen test should be good to enter Hawaii.
I’d recommend getting in touch with someone to confirm this, though.
Thanks for the detailed review. I have seen stories about the RT-Lamp not working when batteries are inserted (all lights flashing etc.). Is it possible to be able to try out the lamp device in advance in Canada by inserting the batteries, and if all looks good, removing batteries and reinserting them at a later date for the actual test. Might avoid an unpleasant surprise. Or would this compromise the test ? Thanks.
Hi Gerry. I reached out to Switch Health and they suggested to not put the batteries in until you are ready to do the test as it could compromise the results. So it sounds like it’s best to wait and not test out the unit.
Hi, just a quick question about the RT-LAMP test. When I fill in the ArriveCAN form, one question is where did you receive your molecular test from? I did the test in US, however the company Switch Health is in Canada. Then how should I answer this question?
I recall putting down Switzerland when I did the test back in the summer (as I was physically present in Switzerland at the time of the test). My intuition would be to put down the US in your case, and if anyone asks, I think it would be a very easy explanation.
It may be ours was a one-off experience, but… when we recently crossed the land border at Buffalo, thethe Canada Border Services Agency officer said “these tests are not valid – you’re required to have tests conducted in the United States.” Of course, we had conducted the tests in the U.S., which we explained. No dice. He waived us to the secondary inspection area and said that a Public Health Agency of Canada (PHAC) representative would review our case.
While we waited in the car, two CBSA agents took the test results and our passports inside to review with PHAC while we waited. When they returned, again… no dice. They told us that our choices were now: 1) return to the U.S., secure a new PCR test, and re-enter Canada or 2) continue into Canada, which would be “a violation of the Quarantine Act, potentially subject to a fine of up to $5000 and/or quarantine in a designated facility.”
Trying not to panic, we asked if we could speak to the PHAC representative, as we had purchased the tests in good faith, relying on Air Canada marketing materials. Eventually, a PHAC agent in full PPE approached the car. From a distance of 8 feet, he explained that the RT-LAMP test kits were causing a lot of confusion, noted that there was a disagreement among his colleagues about how to process cases like ours, urged us on future trips to secure a lab-based PCR, and… let us cross into Canada, this one time only.
Needless-to-say, we were relieved, but what a nightmare!
Yikes – that sounds like a stressful situation! Thanks for sharing this data point.
The inconsistency with the interpretation of test results is problematic. I’m happy it worked out for you in the end, though!
50% failure rate of the tests!!! Either you get “inconclusive results” or just a test failure where all the lights flash. Out of 8 tests we’ve done, 4 have failed. Worse yet, SWITCH WILL NOT REFUND OR REPLACE THE DEFECTIVE TESTS!!
I had the same experience with the RT lamp test. Took over 4 hours to finally secure a connection that wouldn’t drop the call (even one of the Telehealth pros admitted her wifi was slow) then my test lights all started blinking after the 30 minute wait time. My results were ‘damaged specimen’. They said not enough DNA and won’t refund my money, although I followed instructions exactly and was watched the entire time by their Telehealth pro.. Had to scramble to find a lab that would get me results in time. $60 in cab fees then another $150 for the test, plus loss of an entire vacation day. I have filed claim with Better Business Bureau.
Hi, Am I allowed to travel with the RT-LAMP kit on my carry on ? There is no information about it.
Thanks
Yes, I did this no problem.
Ricky, with the Lamp Kit in your carry on did you have to remove the liquid portion and place in a clear liquid bag once going through security?
Could these tests be used to avoid the rule about “test in a third country” for return to Canada from “banned” countries?
For example, if I was in South Africa, (I’m not) could I administer myself one of these tests, get a negative result from Switch Health, and then get on a direct or indirect flight back to Canada without having to test in a third country on the way home?
Obviously this is a super specific situation, but I’ll be travelling to Kenya soon, and I’m worried that Kenya may get added to Canada’s list of banned countries while I’m away.
Hmm, this is an interesting question. If there is specific mention that travellers must be tested at a specific location in a specific country or test in a third country en route back to Canada, then I think that would be the golden rule.
Best to run this one by the feds – the Government of Canada Coronavirus Hotline tends to be a great resource for answers to specific questions.
The kit doesn’t always work – have a back up plan.
Check out this CityTV report. https://toronto.citynews.ca/2021/11/25/at-home-covid-19-test-malfunction/
I bought two test kits for recent travel to the US
We were driving so did the test one day before crossing the border in to Canada
We had troubles connecting to switchealth site at first to do the test because you need to enable your camera and mic in Safari, by default it’s off
Switchhealth customer service was no help, figured it out for myself
The first unit test went well the second failed seconds after we put the batteries in
The unit lights just blinked
We ended up getting a test at a local health clinic
Now the problem is getting switchhealth to give me a refund
I suggest at all costs avoid dealing switch health or have a spare unit
The test they use is the Lucinda Lamp test which is sold in the US for $75USD. Looks like you can buy the test directly from the manufacturer in the US. Search google “check it Lucinda lamp test”. They don’t ship to directly to Canada (probably have a distributor agreement here). Apparently, the manufacturer allows you to upload the test and will provide as report for you. I don’t believe the process involves an appointment with a live person online to guide the test. Question: I live near the border….so if buy the test there, but then fly from Canada to Mexico….do you think this test would be valid? I mean…its the same test that Switch uses. I guess the Lab address would be in the US.
In US and bring it on my trip to Mexico
I think this question would best be directed to the Canadian government.
OK, I called our Canadian Government and they said the Lamp test is acceptable as long as it comes with a report stating the Labs address, negative result, patient details, etc. My only concern was that by buying this test on my own from US, it skips the step you outlined where Switch Health provides a video consult. Anyway, it’s almost half the cost of the Switch Health Kit….and it’s the same kit!
So I called our Canadian Government and they said the Lamp test is acceptable as long as it comes with a report stating the Labs address, negative result, patient details, etc. My only concern was that by buying this test on my own from US, it skips the step you outlined where Switch Health provides a video consult. Anyway, it’s almost half the cost of the Switch Health Kit….and it’s the same kit!
So I got our RT-LAMP test kits (after about 2 weeks of waiting for restocking) for our trip to the US next month. We have about 6 hours between arriving at the airport and boarding time to come back to Canada. Will this give us ample time to get our results back, right? The complete test process from start to finish is about an hour, if I’m not mistaken.
That should be enough time, but you can do the test any time within 72 hours of your scheduled departure time. You’ll need the results to check in to the flight, too, so I’d suggest doing the test a day or two before.
Thank you TJ! It helps a lot to know about this before our trip back to Canada…
How long does it take to connect to Switch Health telehealth professionals to begin the COVID 19 Lamp test?
In the 2 times I’ve done it, it has taken less than 5 minutes.
Heading to Bahamas in December and I think they only need a rapid antigen test so that inexpensive but this product would be great to do in the comfort of our room. My question is, We were going to hop on a flight to Vegas 2 days after returning to Canada. Do you happen to know if the test taken in the Bahamas can be used to get on a plane to fly to Vegas as long as the test is completed within 72 hours of the Vegas flight? I’m thinking it would be okay since it’s a Canadian test.
My hunch is that it would be okay, but it may be worthwhile to have a backup plan (e.g. rapid antigen test) in case it’s not accepted.
Can you take this kit in carry on luggage? Can the liquid portion be safely removed and put in the liquids bag? Will that invalidate the test?
Yes, this can be taken in carry-on luggage. If you need to, I imagine that taking the vial out of its wrapper and placing it in a liquids bag wouldn’t invalidate the test. You only open up the vial once you’re ready to put in the swab.
Hi TJ, great review! I’m wondering if this can be used in place of testing required in a third country for return to Canada from countries like India or Morocco? Normally if Airports from the transiting countries do not offer these tests we’d need to stop over and find a clinic. Do you know if we can just use this at the airport to satisfy the pre arrival test requirement?
Good question. My hunch is that it would satisfy the requirement, but best to follow up with the Public Health Agency of Canada for confirmation.
Thanks. I’ve sent them a note to confirm this as well. I will post what they say for everyone’s benefit.
Hey Billybob, did you ever get some clarity on using the RT-LAMP test to avoid the “must test in a third country” rule?
Hello Jon, I wasn’t able to get a confirmation in writing from PHAC or CBSA. However when I called CBSA they said it should be acceptable. I’d encourage to do your due diligence based on your flight plan as the rules are continuously changing and I wasn’t able to find a definitive answer with respect to RT LAMP self test in relation to requirements in place for India and Morocco
Any idea when switch health will have more of these available since they are sold out? I am on the waiting list.
I heard back from Switch Health today. They will be contacting people on the waitlist very shortly. They should have a regular stock going forward, too, so hopefully no more running out of tests 🙂
That’s awesome! Thanks for the update!
I’ve reached out a couple of times to my contact and it has been crickets. I hope to have an update on stock soon.
Thanks for this just received couple of these for upcoming trip. Hopefully connection is quicker then the 4 hours last time with a take home test from switch health . Thanks again .
Well done
Please advise of the cost.
Also, is this test good to get into Hawaii!
Thanks
just came back from Hawaii. (Dec26-Jan2). Hawaii is now aligned with US CDC. Antigetn test is sufficient and cheaper. Coming back to Canada, you do need PCR or RT-LAMP. Safe travel
Great question Jerry. I have doubts about it being suitable for Hawaii at the moment. From what I understand, they are holding out for NAAT tests.They are outliers in this area and very strict on tests. But let’s hope an expert responds: I am only a fellow traveller wrestling with the same problem of Hawaii. Good luck to all of us. Rob
Unfortunately, to bypass quarantine in Hawaii you’ll need to have a negative test through one of the Trusted Testing Partners in Canada. The info for these partners may be found on the Air Canada, WestJet, and the State of Hawaii travel websites.
No lab required? Does the kit actually contain the lab chemicals – like a pregnancy kit?
Yes – the RT-LAMP and antigen tests are performed wherever you are on a testing device.
Cannot find where to buy RT-Lamp. Air Canada only offers the other two test on their web page. Switch Health web page has no link for purchasing the test, only information and a video.
Not getting information about use and timing when travelling by car and visiting a very small town. How would mailing to a lab, hoping to get results with the 72 hour max limit work? I am only staying in the US for 4 days before returning to Canada.
With the RT Lamp test you would buy it in Canada before you leave, take it with you, and do the test on Switch Health platform before you return to Canada. Also need to upload your result in ArriveCAN.
The actual test for the RT-LAMP kit is done wherever you are on your desk/table/etc, so you don’t need to mail in the results. You get results within 45 minutes.
not unless you are an aeroplan memeber and use some points. Only options provided when I logged in
There is an option to redeem points or to purchase the kits using cash and earn Aeroplan points. The kits are also available on the Switch Health website. It looks like they’re sold out of the RT-LAMP kits at the moment.
Where do you purchase the RT-LAMP Test kit?
You can purchase the kit on the Aeroplan eStore
not unless you are an aeroplan memeber and use some points. Only options provided when I logged in
Why don’t people read the information provided before they ask a question that has been asked over and over?? Clearly the RY-LAMP test is approved for entry to Canada. AND all the information needed is provided. Jeepers. Grab a brain people.
thank you for posting this. just purchased test kits to take to Disney, seems like an easier way to test out to return to Canada. We are flying with Westjet and just wanted to confirm, it’s not airline specific (?) and will met the requirements to enter Canada, the address of the lab (?) seems to be a bit of a concern thank you for any info support you can provide
The test isn’t airline specific (airlines tend to enforce the rules for the countries to which they fly), so you can use it with WestJet. The address is included on the test result (note the image on this post).
Does this kit only work with Air Canada flights? Or can I use with any airline coming to Canada (say West Jet)?
It works with any airline. The testing requirement is a federal government requirement.
I was just online with Switch. They advised the test turnaround time was not in the 72 hour window and it cannot be used to get back in to Canada????
Thats not acccurate. Agent was within .5 h, results available after uploaded picture in about 2 h for both myself and my partner traveling on Jan 2, 2022 back from Maui.
The person i spoke to online was very very confusing, didn’t have the correct information and said they did not say anywhere on their site the test could be used to get back into Canada
The turnaround time for the RT-LAMP (a molecular test) and the Rapid Antigen Test is around 45 minutes – the test is done on your table. The RT-PCR test must be sent into a lab for processing, so it takes longer due to mailing and then lab processing.
On the Government of Canada website, it ask for the address and name of the facility or clinic where the COVID-19 test was administered. What do you put in that field?
That information is included on the test result (see the imagine on this post).
Regarding scalability, I contacted Switch Health via chat and was not impressed with the response time. The initial bot didn’t offer an option for my question, but eventually gave me the option to chat with a human. The rep curtly responded within the few minutes noted, but then my follow up responses were not even seen by the rep for 5 minutes, so I dropped the session.
I contacted to ask if there is a place to pick up the RT-LAMP kits in Vancouver (to take on a trip that starts tomorrow). The answer is no, they must be shipped.
I AM NEW TO THE QR CODE SCANNING BUSINESS. DO I NEED TO HAVE A QR SCANNING APP ON MY PHONE FOR THIS?
No, for most (all?) smartphones, you just use your camera. I can only definitely speak to Phones as that’s what I’m using, but you just point your camera at for a few seconds. You should see a notification drop down from the top when it scans correctly. You click this notification and it’ll take you where the code tells you to go (usually a website in Safari).
I just found this out , I’m interested but hesitant. We’re going to Mexico in few weeks and would love to save on testing, we’re flying Sunwing, will this be sufficient enough for return home.
Yes, it’s valid for all airlines.
Ordered for return flight to Canada from upcoming trip to Australia. What is your advice please…..can it go in checked luggage or should it travel only in carry on? Thanks so much!
I reached out to Switch Health about this. They mentioned that it’s up to you where to put it to minimize the chance of damage. My bet would be carry on.
I would really appreciate if you did post the full screenshot of the test result document – of course with your confidential information crossed out. I would like to see if the test document satisfies different requirements that the other countries have.
We have updated the article with the full document. Thanks for the reminder!
I’m traveling back to Canada from the US (driving). Can this also be used for crossing a land border?
The requirements to enter by land are for a negative molecular test taken in the United States. Technically, the test is taken in the United States, but the document will show the lab in Canada. Best to contact governmental authorities on this one. I’ve found the Government of Canada COVID-19 hotline folks to be particularly knowledgeable and helpful: https://health.canada.ca/en/public-health/corporate/contact-us.html
Is it safe to assume that this test is not specific to Air Canada Travellers? and can be used regardless of which airline / or method of entry back into Canada?
Great write up by the way!
Yes – it’s not specific to people flying with Air Canada.
What if your internet connection goes down, or those healthcare professionals are not available to supervise your test due to high demand?
This actually happened to me. As my partner used the kitchen, I thought to minimize the interference, I went into the bathroom (bad idea as internet was sporadic). Connected with agent then line dropped but somehow, she managed to reconnected the session with me (Rebecca), very patient and nice. As for uploading the test picture, I dont know what would happen if the line drop. Best is to find an area where you know the line is stable or switch to local carrier if wifi is bad. Our hotel wifi in Maui was terrible as the building is concrete and wifi is on top of the roof and our room was level 3. Safe travel.
Good point. If your internet connection goes down, I imagine that you’d be able to reconnect. As per availability of staff, it will be good to see more data points from people as this product rolls out.
In my experience, I waited less than 5 minutes both times I used it.
Sure you would be able to reconnect eventually. The question if your test would still be valid if interrupted.
When you tried the test, it was not available to general public yet. How well prepared Switch Health to scale?
I don’t mean it is a bad idea. It can be helpful for saving effort and time. However considering the cost there are some risks involved.
My contact at Switch noted that in the event of a dropped call, the appointment is held until you can reconnect. I’m not sure if there’s a time limit, but I suppose this could be a rare occurrence.
It remains to be seen how prepared they are to scale. I’m sure the community will make it known loud and clear if there are any hiccups with long waits.
TJ, is there a limit to the number of tests that can be run on the unit? Or, is it unlimited?
I believe it is only one test per unit.
Is there an expiry date printed on the package? What about storage info? (I’m guessing room temp – what if I was travelling to locales with extreme temps?)
There is an expiration date on the package and they are valid for up to 1 year from the date of manufacture.
I imagine that the usual recommendations to avoid direct exposure to high temperatures (leaving it out in the hot sun) will suffice.
The Government of Canada testing for travelers website says your test result must contain the “name and civic address of the laboratory/clinic/facility that administered the test” (https://travel.gc.ca/travel-covid/travel-restrictions/flying-canada-checklist/covid-19-testing-travellers-coming-into-canada). Is this provided on the result for the COVID-19 RT-LAMP Test Kit? That’s my concern right now with this test…not having the proof of test accepted because it is missing information that is required.
Hi Maxine. I reached out to Switch Health for this. All of the required information is printed on the test result – I’ll upload the full screenshot from my test and replace the current picture on the site to reflect this. For the past 3 months, they haven’t reported any issues with the test results at the border (I can attest to this in my experience).
Thanks! One more question…do the tests have an expiry date? Just thinking if you want to pack one, want to make sure it can still be used in a few months.
The tests are valid for up to one year from the date of manufacture, and they have an expiration date printed on the box.
The desktop is only necessary for the PCR not the RT-Lamp
I suggest you put the batteries in your pocket and use them in something else.
Problem solved
TJ, you state that you need a “mobile device with a camera” but the instructions that you posted clearly show a desktop in addition to tablets or phones.
I’m not impressed with the e-waste generated from this. i doubt people will be responsible enough to dispose of the device and especially the batteries after use in a hotel room in a location that is not home. this is terrible.
I agree with the generation of e-wastes but travelling itself generates a lot of single use wastes. This will require a re-think of how we travel.